Create, Package & Publish your OWN Python Library

AI enthusiast ,working across the data spectrum. I blog about data science machine learning, and related topics. I'm passionate about building machine learning and computer vision technologies that have an impact on the "real world".
1. Introduction
When you create a Python file, you are creating a Python module. Any Python file that you create can be imported by another Python script. Thus, by definition, it is also a Python module. If you have two or more related Python files, then you may have a Python package.
Some organizations keep all their code to themselves. This is known as closed-source. Python is an open-source language and most of the Python modules and packages that you can get from the Python Package Index (PyPI) are all free and open-source as well. One of the quickest ways to share your package or module is to upload it to the Python Package Index or Github or both.
In this article , walks you through how to package a simple Python project. It will show you how to add the necessary files and structure to create the package, how to build the package, and how to upload it to the Python Package Index (PyPI).
For this demo ,I will create a python library which will perform simple operations like addition, subtraction ,multiplication and division of two numbers.
2. Packaging a Project for PyPI
Step-2.1: Creating directory
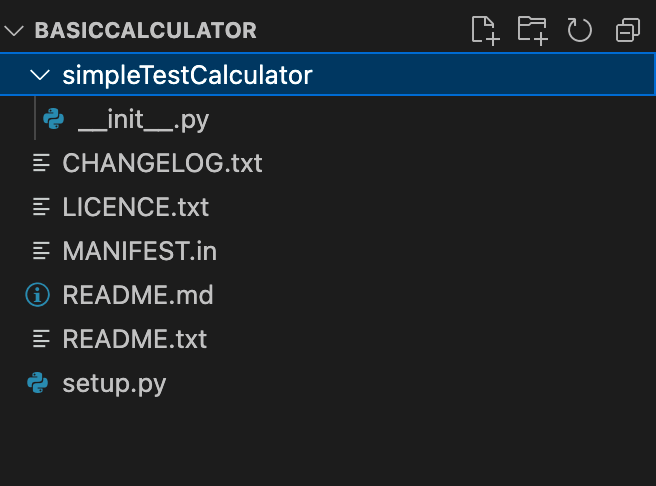
Create a directory for your package which will contain the following files.
   README.txt
   LICENCE.txt
   CHANGELOG.txt
   MANIFEST.in
   setup.py
   mymodule/
      __init__.py
2.2 Step-2: Including modules in init.py
Here init.py is where we will include our python module. As example here i will create functions for simple calculator.
def add_numbers(num1, num2):
    return num1 + num2

def subtract_numbers(num1, num2):
    return num1 - num2

def multiply_numbers(num1, num2):
    return num1 * num2

def divide_numbers(num1, num2):
    return num1 / num2
2.3 Step-3: Including LICENCE.txt
Choose a licence for your module. (For American readers, note that in the USA you spell it ‘license’ instead). Store a copy of your licence in the file LICENCE.txt. There are many licences to choose from, but my personal favourite is the MIT licence because it does not have many restrictions and it is simple. Other suitable licences for Python modules would be BSD, Apache or LGPL. I would not use the GPL licence for a Python package because any projects that use it are forced to use the GPL licence too. This may prevent some people from being able to use your library.
Copyright 2022 Gayathri Selvaganapathi

Permission is hereby granted, free of charge, to any person obtaining a copy of this software and associated documentation files (the "Software"), to deal in the Software without restriction, including without limitation the rights to use, copy, modify, merge, publish, distribute, sublicense, and/or sell copies of the Software, and to permit persons to whom the Software is furnished to do so, subject to the following conditions:

The above copyright notice and this permission notice shall be included in all copies or substantial portions of the Software.

THE SOFTWARE IS PROVIDED "AS IS", WITHOUT WARRANTY OF ANY KIND, EXPRESS OR IMPLIED, INCLUDING BUT NOT LIMITED TO THE WARRANTIES OF MERCHANTABILITY, FITNESS FOR A PARTICULAR PURPOSE AND NONINFRINGEMENT. IN NO EVENT SHALL THE AUTHORS OR COPYRIGHT HOLDERS BE LIABLE FOR ANY CLAIM, DAMAGES OR OTHER LIABILITY, WHETHER IN AN ACTION OF CONTRACT, TORT OR OTHERWISE, ARISING FROM, OUT OF OR IN CONNECTION WITH THE SOFTWARE OR THE USE OR OTHER DEALINGS IN THE SOFTWARE.
2.4 Step-4: Create a README.txt
README.txt file containing a summary of what your Python package is all about.
This is a very simple calculator that add, subtract, multiply or divide two numbers.
2.5 Step-5: Create a CHANGELOG.txt
CHANGELOG.txt file lists all the changes in every release of your package. That way when you release the next version, people will know what has changed. Here is a simple template to start with:
Change Log
==========

0.0.1 (01/08/2022)
-------------------
- First Release
2.6 Step-6: Create a MANIFEST.in
MANIFEST.in file contains the Python packaging mechanism which files belong to your package:
global-include *.txt *.py
2.7 Step-7: Create a setup.py
setup.py file is a script that is used to compile your package and submit it to PyPi.
from setuptools import setup, find_packages

classifiers = [
  'Development Status :: 5 - Production/Stable',
  'Intended Audience :: Education',
  'Operating System :: Microsoft :: Windows :: Windows 10',
  'License :: OSI Approved :: MIT License',
  'Programming Language :: Python :: 3'
]

setup(
  name='simpleTestCalculator',
  version='0.0.1',
  description='A very basic calculator',
  long_description=open('README.txt').read() + '\n\n' + open('CHANGELOG.txt').read(),
  url='',
  author='Gayathri Selvaganapathi',
  author_email='gayathri.s.de@gmail.com',
  license='MIT',
  classifiers=classifiers,
  keywords='calculator',
  packages=find_packages(),
  install_requires=['']
)
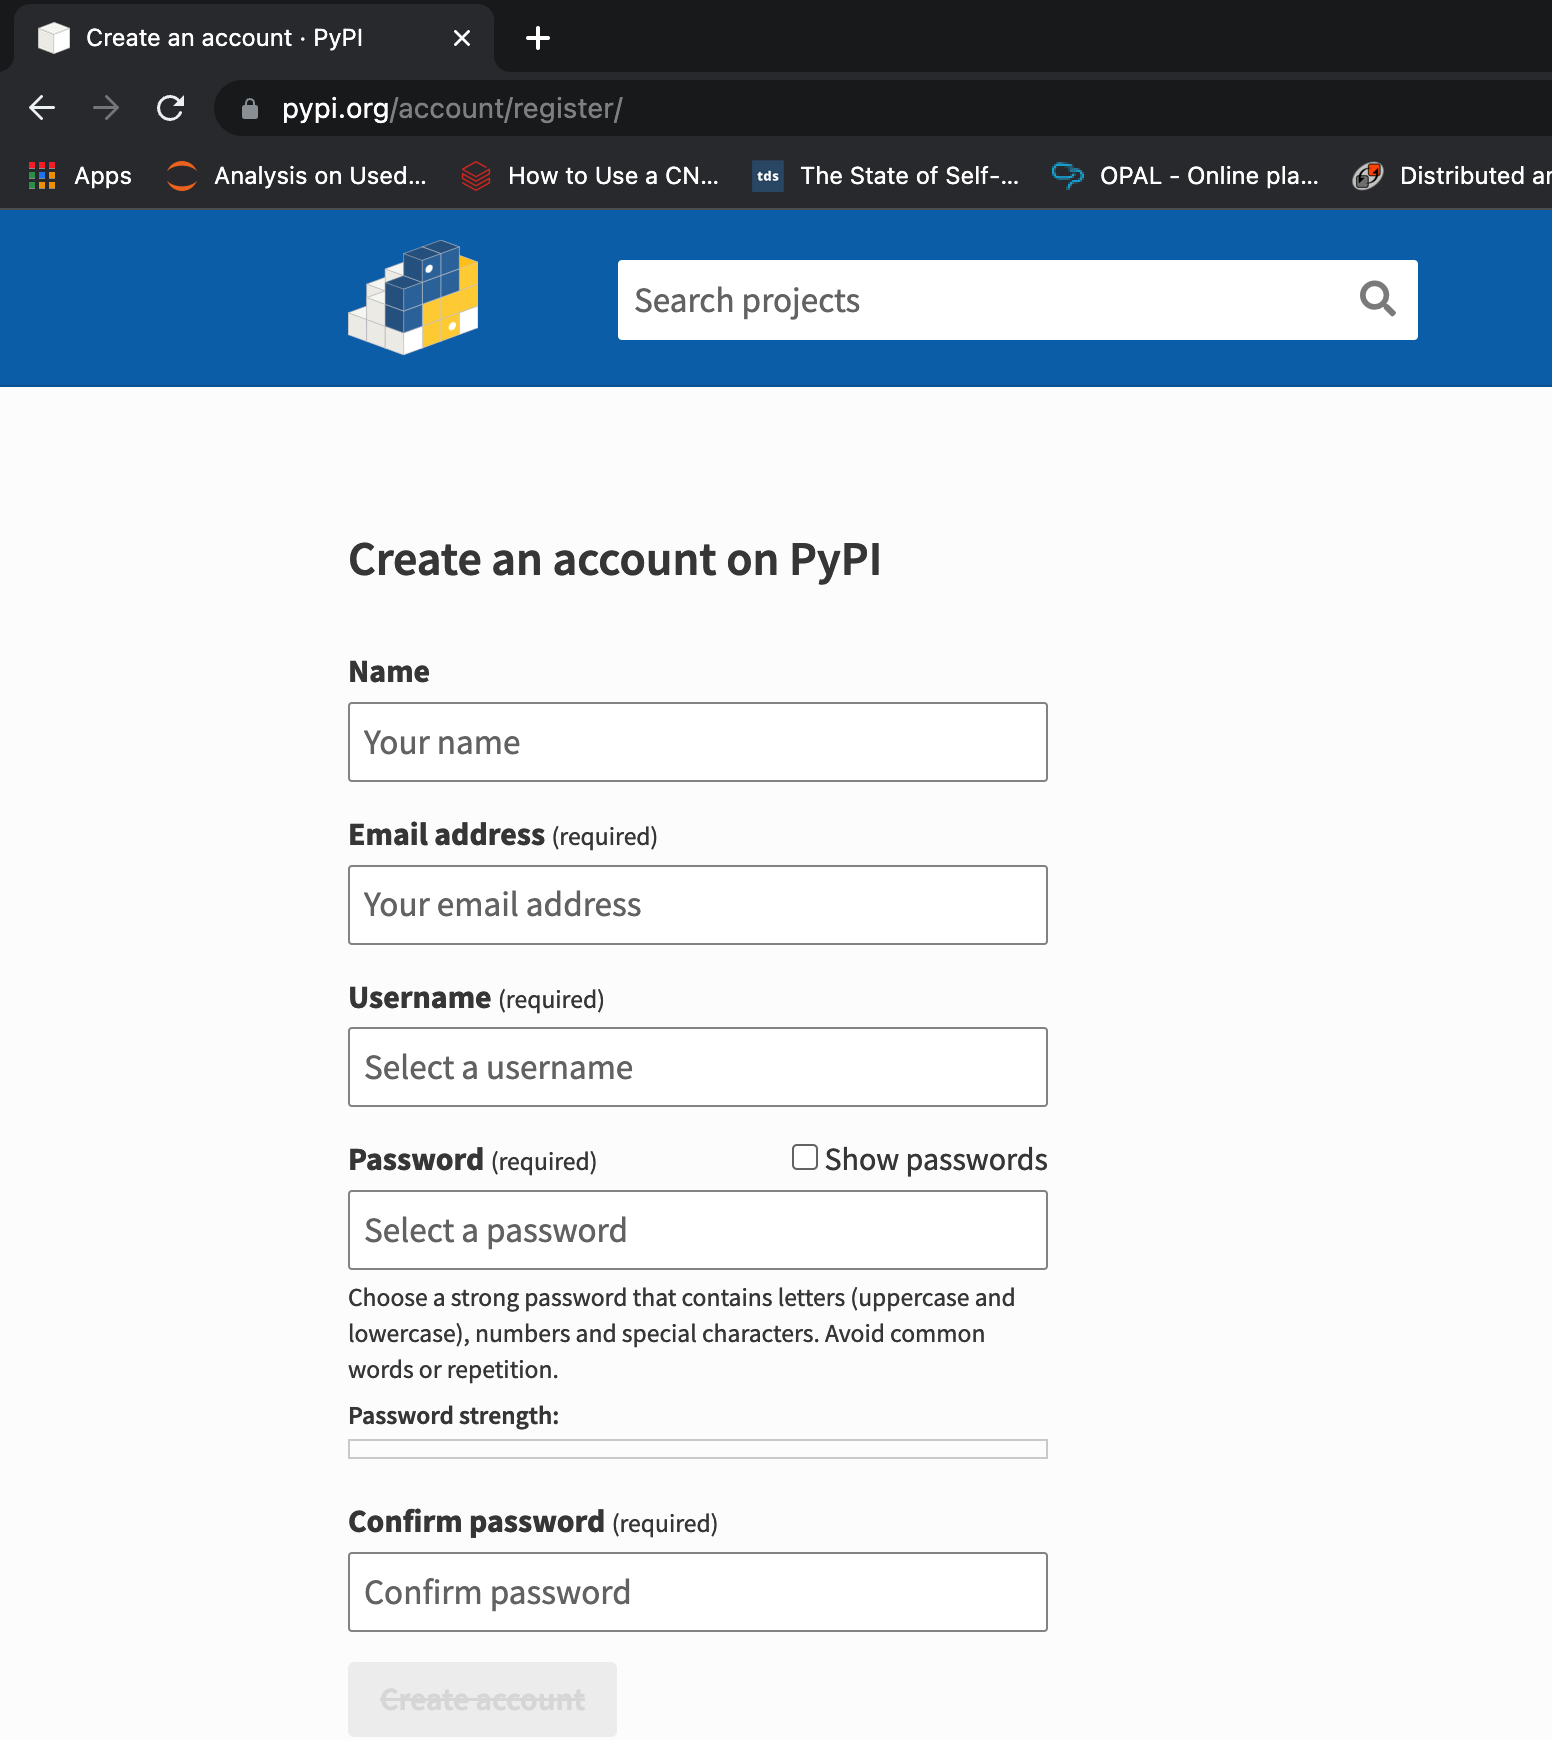
3. Create account on PyPI
If this is your first time creating a Python package, you will need to create an account on PyPi. If you are creating a new Python package, you will also need to register it. To register an account, go to https://pypi.org/account/register/ and complete the steps on that page.
4. Generating a Python Wheel
The setup.py is used to create Python wheels. It's always a good idea to make sure you have the latest version of setuptools and wheel installed, so before you create your own wheel, you should run the following command:
python3 -m pip install --upgrade setuptools wheel
Now you are ready to create a wheel yourself. Then run the following command:
python3 setup.py sdist bdist_wheel
This command will output a lot of text, but once it has finished you will find a new folder named dist that contains the following two files:

The tar.gz is a source archive, which means it has the Python source code for your package inside of it. Your users can use the source archive to build the package on their own machines, if they need to. The whl format is an archive that is used by pip to install your package on your user's machine.
4. Publish library to PyPI
To upload your package to PyPI, You will use twine. To install twine, you can use pip like this:
python3 -m pip install --upgrade twine
Once installed, you can upload your package to PyPI using the following command:
python3 -m twine upload --repository-url https://upload.pypi.org/legacy/ dist/*
When you run this command, it will prompt you for a username and password.When this command runs, you should see output similar to the following:
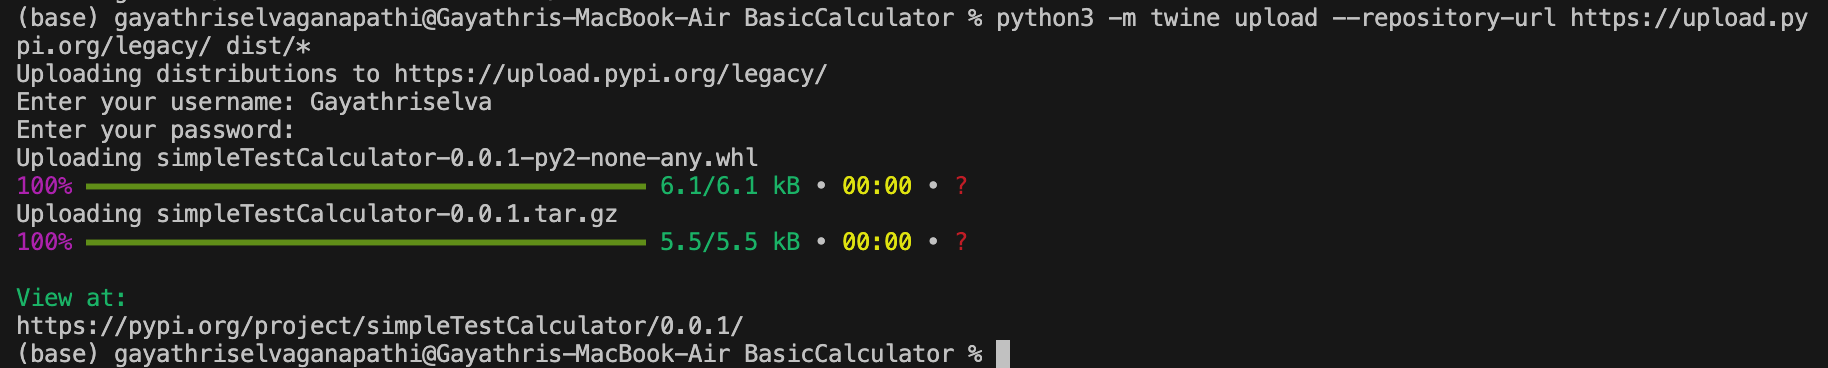
At this point, you should now be able to view your package on PyPI at the following URL:https://pypi.org/project/simpleTestCalculator/0.0.1/
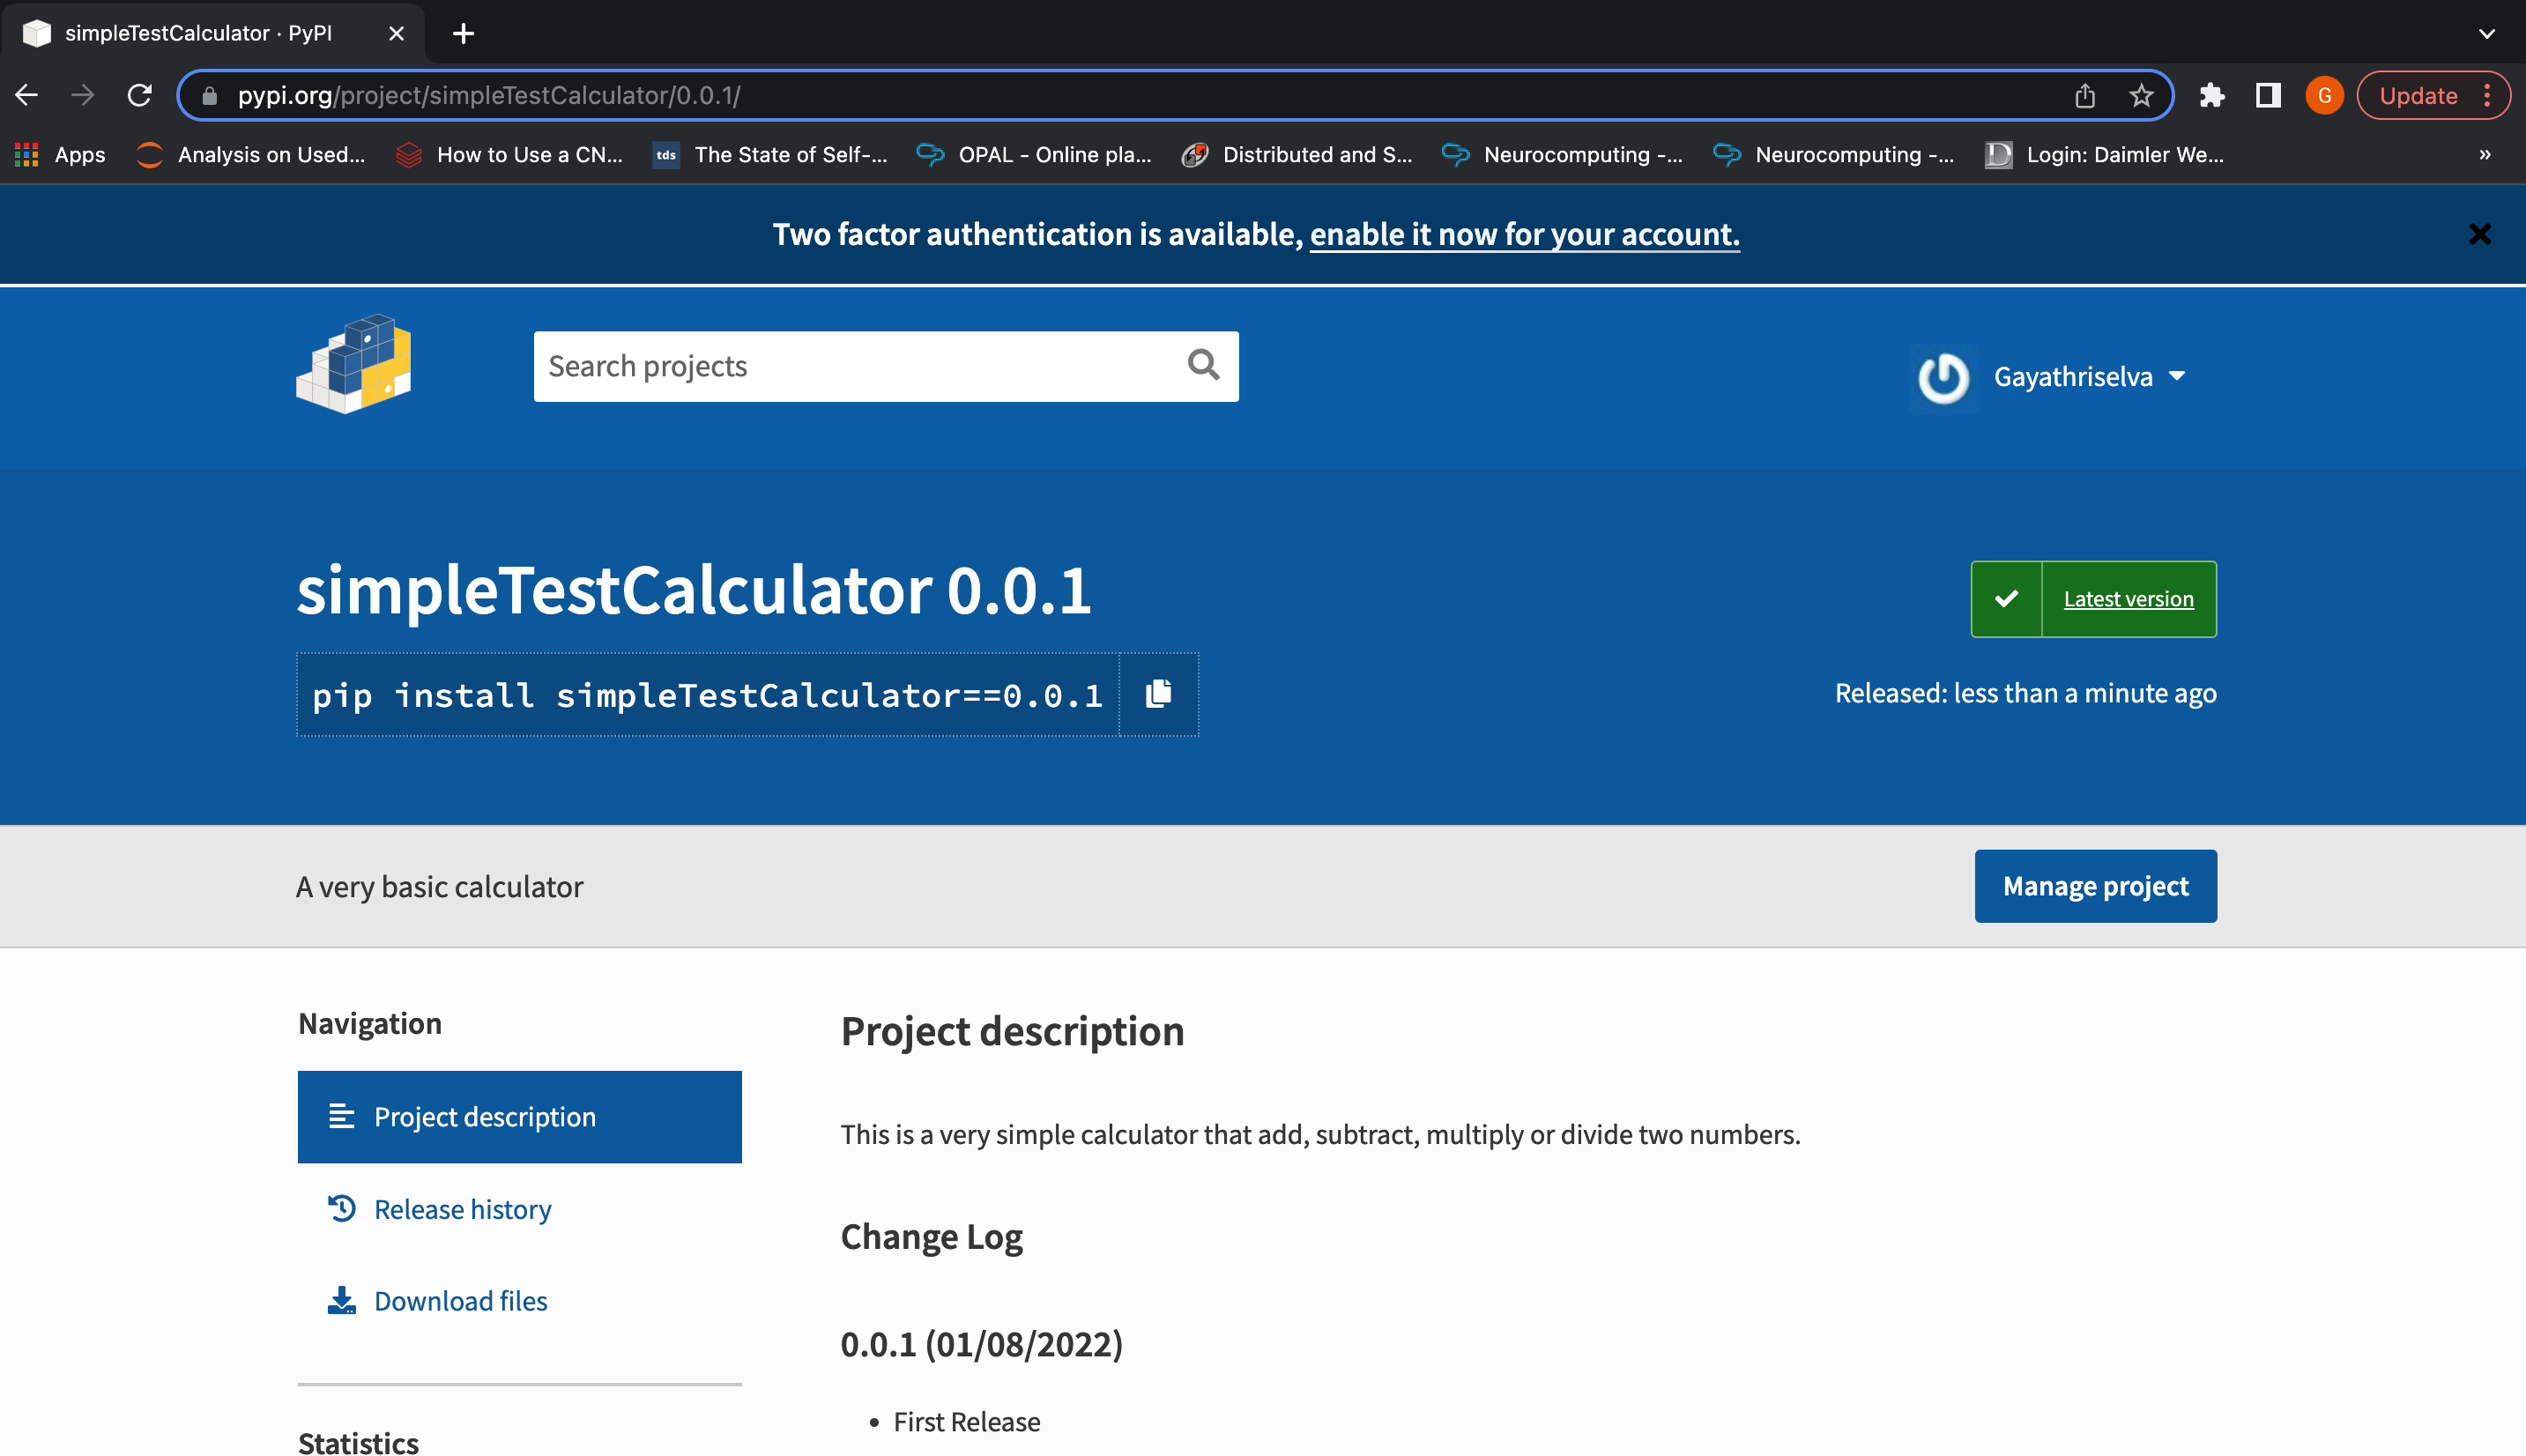
Now you know how to distribute a package of your own creation on the Python Package Index!.Now your package can be installed from the real PyPI using python3 -m pip install [your-package].


